
In this post I explain how I use the Hydreon RG-15 in tipping bucket mode. There I use the J1 connector and listen for virtual “tips”, analog signals that indicate a certain amount of rain has been detected. The RG-15 also has a J2 connector which allows for digital communication via a serial connection between the device and the microcontroller – in my case the Wemos D1 Mini. Using this option we can read more information from the sensor than a simple “tip” event.
In stead of waiting for such an event, we explicitly ask the device for data using various commands. The documentation explains what commands can be sent to the RG-15. The only command returning relevant data pertaining to the sensor output is command ‘R’. It returns 4 values:
Acc is the accumulated rain since the last time the data was read.
EventAcc is the accumulated rain for the “current event”. A rain event, says the documentation, “starts when the first drop is detected and ends 60 minutes after the last detected drop. EventAcc is cleared after the Event ends.”
TotalAcc is the total rain accumulation since the last reset command.
RInt represents rain intensity.
While the documentation suggests a best resolution of 0.02mm, RInt actually updates before any change to the Acc value. After some communication with Hydreon I learned that the dip switch settings for resolution only apply to the J1 interface. Serial communication always presents data with maximum resolution. When polling for the rain data every 2 seconds using the ‘R’ command, this can be a typical output:
Acc 0.00 mm, EventAcc 0.00 mm, TotalAcc 5.71 mm, RInt 0.05 mmphEven though the Acc value is still zero, apparently something has happened because RInt has changed. 0.05mm per hour is, of course, practically nothing. Then there is Acc itself. It doesn’t increment with 0.02 mm each time. A light rain event might result in this output:
Acc 0.01 mm, EventAcc 0.01 mm, TotalAcc 5.72 mm, RInt 0.10 mmphEven an accumulation of 0.01mm registers when polling using the ‘R’ command. So while the documentation only mentions a best resolution of 0.02mm and even refers to commands that can force high or low resolution, this does not actually apply do the serial output itself.
How to achieve serial communication between the RG-15 and a Wemos D1 Mini? As for the wiring, below is the circuit board of the RG-15. Four wires are connected to the J2 interface. The spacing between the pins is a standard 2.54mm so a few DuPont connectors crimped onto those wires connect perfectly. They are attached to V+ (white) and GND (brown) for power and SO (green) and SI (yellow).
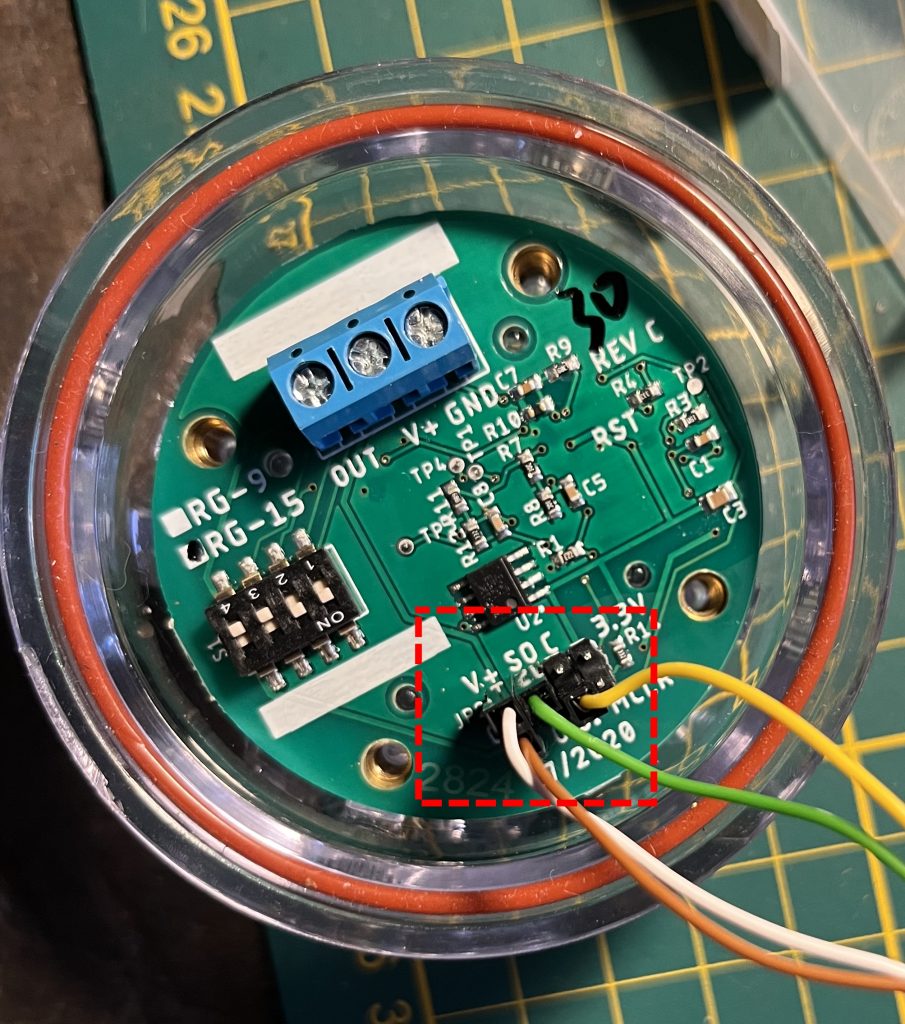
SO (out) and SI (in) are the serial pins. The most obvious counterparts on the D1 Mini are the RX (receiving) and TX (transmitting) pins. These are the dedicated pins for serial communication or UART (Universal Asynchronous Receiver/Transmitter). They function differently than general purpose IO pins (GPIO) like D1. However, none of my controller PCB’s are designed to connect to RX and TX. Technically it may be possible to map RX/TX to different pins using Serial.swap(), but I have never attempted this before. Luckily there is an easy alternative. Rather than using hardware serial communication there is the option of software serial. This allows using any set of digital pins to emulate the behavior of the RX/TX pair. In my case I use pins D1 and D2 since these are also used for I2C and I have several devices that use this interface already.
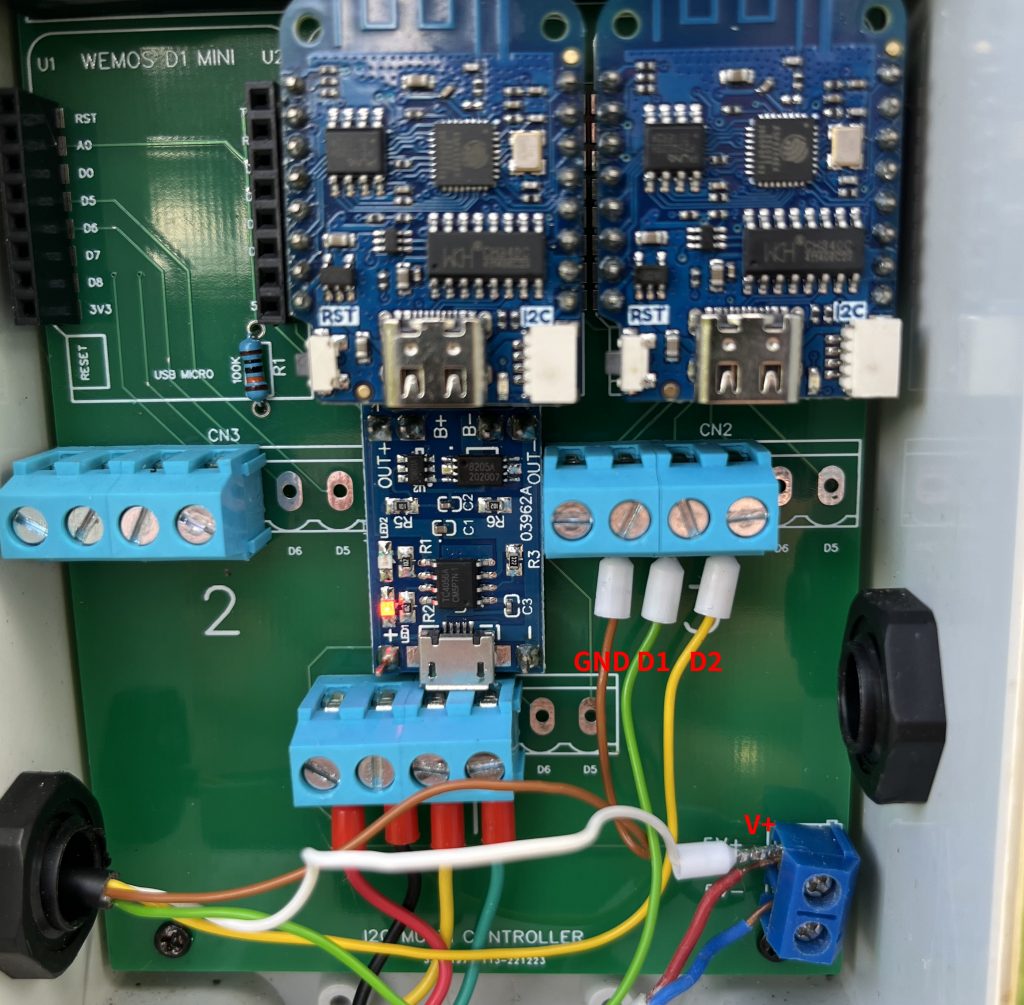
The image above shows how I hooked up the other sides of the wires into one of my controller boxes. As before the RG-15 and D1 Mini share a power source and therefore (importantly) share grounds too.
In order to use D1 and D2 for serial communication, we can use a library called SoftwareSerial. Here is the minimal initial code required to initialize the connection.
#include <SoftwareSerial.h>

..

static const int SO_PIN = D1; // green, receives data on this pin
static const int SI_PIN = D2; // yellow, transmits on this pin

SoftwareSerial rgSerial(SO_PIN, SI_PIN);

..

void setup() {
  Serial.begin(115200);

  Serial.println("Executing RG-15 serial setup...");

  rgSerial.begin(9600);

  delay(1000);

  sendCommand("K");

  delay(1000);

  Serial.println("Setup complete...");
}

void sendCommand(const char *cmd) {
  rgSerial.print(cmd);
  rgSerial.print('\n');
  Serial.print(F("Sent command: "));
  Serial.println(cmd);
}
To avoid confusion, the Serial.begin() and Serial.println() function calls have nothing to do with the the RG-15 and are there purely for logging purposes. The code shows an instance of SoftwareSerial is constructed called rgSerial using the D1 and D2 pins. Upon setup, the begin() function is called on rgSerial with a baud rate of 9600, which is the default of the RG-15. Subsequently I send the command ‘K’ (kill). It restarts the RG-15. In some cases this I did not appear to be getting a response from the device without the restart, so it seems a clean thing do when booting the D1 Mini. The sendCommand() function is simple and sends a single character command to the RG-15 using the print() function of SoftwareSerial. The character ‘\n’ is used to indicate the end of a command.
Now we need to get data. While the J1 interface required an active listener for events over de OUT pin using attachInterrupt(), all we really need to do now is pass the character ‘R’ to the sendCommand() function. But I want to poll for the data continuously, so my loop function looks like this.
String rgLine = ""; // we collect any output from the RG-15 into this string
unsigned long lastR = 0;

..

void loop() {
  while (rgSerial.available()) {
    char c = (char)rgSerial.read();
    if (c == '\r') continue; // ignore CR
    if (c == '\n') {
      handleRGLine(rgLine);
      rgLine = "";
    } else {
      rgLine += c;
    }
  }

  if (millis() - lastR >= 2000 && rgLine.length() == 0) {
    sendCommand("R");
    lastR = millis();
  }
}
The while loop checks if we have received any data and collects any characters into the string called rgLine. If any content is available, the first character present is read. We expect the value to be one of three things. First, the ‘\r’ character is ignored. In serial communication, it may mark the end of a line, but we know for sure that the RG-15 sends ‘\n’ when the end of a line is reached, so we only focus on that. Second, in case ‘\n’ is received we have reached the end of the line and the collected content is passed to handleRGLine() for parsing and processing. The rgLine value is reset for the next moment data is received. Third, if the character is neither ‘\r’ not ‘\n’, we assume that the character is part of the line content and we concatenate it to rgLine.
The actual command ‘R’ is only sent after there is no data left to be read. Also, it is only sent only under the condition that the last time it was sent is more than 2 seconds (2000 ms) ago
Depending on the goals of the sketch, different things can be done with the output. In the of example of handleRGLine() below, the values are extracted into separate variables and printed.
void handleRGLine(String line) {
  if (line.startsWith("Acc")) {
    float acc = 0, eventAcc = 0, totalAcc = 0, rInt = 0;

    sscanf(line.c_str(),
           "Acc %f mm, EventAcc %f mm, TotalAcc %f mm, RInt %f mmph",
           &acc, &eventAcc, &totalAcc, &rInt);

    Serial.print("Parsed: Acc=");
    Serial.print(acc);
    Serial.print(" EventAcc=");
    Serial.print(eventAcc);
    Serial.print(" RInt=");
    Serial.println(rInt);
  }
}
Extracting the values like this allows for easier further processing. During my current testing phase I am only interested in non-zero values for Acc and RInt.
Acc 0.00 mm, EventAcc 0.00 mm, TotalAcc 5.90 mm, RInt 0.02 mmphAn output like this shows the most minimal rain intensity. It could the very light start of a rain shower or it could just as well be a false positive due to other outside influences. False positives are the main focus of my testing right now. My takeaways will be part of a next blog.